The installation of the ventilation duct system is easy
Mikko Fiskaali from Seinäjoki says that the installation of the ventilation ducts is so easy when using the Vallox BlueSky that he would certainly make the same choice again.
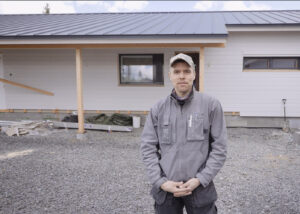
Mikko Fiskaali is building a detached house in Seinäjoki and decided to install the Vallox BlueSky air distribution system in it. The choice was easy, as Mikko’s previous house also had the same system, and he was extremely pleased with it. As Mikko was building his new house himself, the main factor affecting the choice was the easy installation of the ventilation duct system.
-When I was building my first house, I chose the BlueSky system almost by accident. I had little installation experience at the time and found out that the installation of the system is extremely easy- also for a complete amateur. This is why I chose the Vallox BlueSky system again without a moment’s hesitation, says Fiskaali.
The Vallox BlueSky duct is extremely flexible and light, making it also suitable for confined spaces. According to Fiskaali, the system is easy and quick to install by a single person, which also creates savings in building expenses.
All in all, the installation of the BlueSky ventilation duct system took roughly four hours. The dimensioning of the sheet metal connections on the previous day took roughly two hours. A neighbour built a similar system in his house by using sheet metal ventilation ducts, and it required four hours of work every day for one week to complete.
Watch the video (in finnish) how Mikko built BlueSky air distribution system
Article continues after the video.
The difference between the traditional and the BlueSky duct
Mikko ordered, from a professional, a ventilation plan that used the Vallox BlueSky duct system. This is important because plans prepared for sheet metal ducts cannot be used for the Vallox BlueSky ducts directly. This means that some of the benefits of the Vallox BlueSky might be lost.
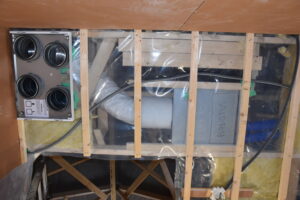
The main difference between the Vallox BlueSky ventilation ducts and the traditional sheet metal ventilation ducts is the size. In the traditional ventilation duct system installed in a detached house, air usually travels along a single 160 or 200 mm wide duct until the airflow and the diameter of the ducts is reduced after duct and valve branches. In the Vallox BlueSky system, air is only led as far as the air distribution box by using a wide duct. From the air distribution box, a flexible 75 mm duct leaves for each valve. For valves exceeding 8 dm3/s, it is recommended that two parallel ducts be installed. The use of one and two ducts make the measuring of airflows easier because such a system is naturally self-adjusting. Easy adjustment is one of the most highly-rated features of the Vallox BlueSky.
Calculating the need for supplies based on the ventilation plan
The installation of the Vallox BlueSky duct system began with calculating the need for supplies and ordering the parts. Mikko calculated the need for supplies himself, based on the ventilation plan. The ventilation duct system of Mikko’s house required two distribution boxes with 10 outlets each, 15 connection parts for valves and 4 rolls of the BlueSky duct.
-In regard to the duct, I overestimated the need and some was left over. I also ordered a few exterior connectors for duct joints.
Everything needed for the installation of the distribution boxes, including mountings, was delivered with the boxes. Plugs provided with the box can be placed in any unused outlets of the distribution box. The recommendation is that the duct between the distribution box and the valves is installed with as few joints as possible, as this makes it completely airtight. Seals are installed in the joints, if any are needed. Similar seals are also installed in the distribution box outlets and the connection points of the valves.
The ventilation duct system could be installed alone
Mikko completed most of the installation himself. For this reason, the easy installation of the BlueSky ventilation duct contributed to his choice. The excellent ventilation plan prepared for the building, the lightness of the BlueSky ducts, and their quick installation made the installation of the duct system pleasing.
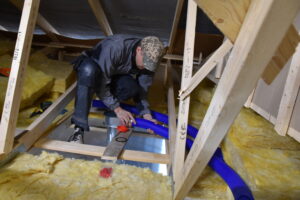
The work started with the installation of the ceiling mounting plate of the Vallox 110 MV ventilation unit and by mounting the valve connection parts in their correct locations based on the plan. Next, the distribution boxes were installed. Mikko designed the service hatches of the distribution boxes to enable easy servicing and so that no insulation wool will fall onto the floor when the hatches are opened.
-Service hatches are located on the ceiling so that no furniture needs to be moved to service the duct system and the hatches can be reached by using a standard kitchen step.
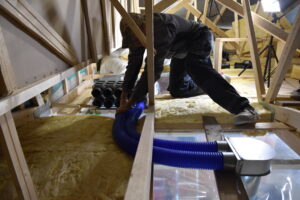
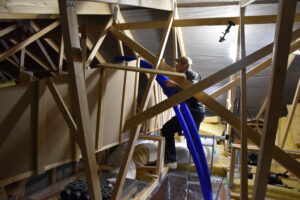
Mikko measured the BlueSky ducts ready on the floor, as there was enough space for the job at the tidy building site. Next, he easily pulled the light ducts several at a time into the attic and installed them in place. In the narrow attic, the flexible duct was quick and safe to install, because there was no need to move around in and back and forth to the attic, and there were no sharp sheet metal edges. No drilling and riveting were needed either. Once the ventilation ducts had been installed, all open ends were plugged and the system was left waiting for the installation of the ventilation unit and the valves. The work was easy to complete alone and the installation of the ducts only took around four hours.
In Mikko’s one storey house, the ventilation ducts were installed directly into the blown wool. Alternatively, the ducts can be installed below the vapour barrier without massive enclosures. The narrow duct is also easy to hide in the structures of the house. In a two-storey house, the ventilation ducts can be installed inside the intermediate floor and partition walls, so there is no need to make extra holes in the vapour barrier. This way, no thermal insulation is needed in the ducts and the fresh air does not heat up in the attic when the weather is hot.